
 153 Leytonstone Road, E15 1LH, London






What if the difference between a high-end finish and a botched floor layout comes down to a single millimetre of cumulative error over a ten-metre run? Professional tilers understand that even a tiny misalignment at the start of a project leads to massive headaches by the time the far wall is reached. Finding the best laser level for tiling is no longer just about convenience; it’s a requirement for those dealing with large-format slabs and modern textured surfaces. In an industry where precision is everything, relying on outdated spirit levels often results in wasted materials and frustrated clients.
Maintaining perfectly straight grout lines on uneven substrates is one of the toughest challenges on site. This article identifies the most accurate tools currently available to help tradespeople achieve flawless wall and floor alignment every time. The following sections detail how to select a model that offers high visibility in bright conditions and 360-degree coverage to speed up the layout process. There’s also an examination of how the latest 2026 safety standards and green-beam innovations help professionals reduce tile wastage and deliver a superior finish for clients.
Table of Contents
- Defining the Professional Laser Level for Tiling
- Key Technical Specifications for Precision Tiling
- Comparing the Best Laser Levels for Tiling Projects
- Step-by-Step: Using a Laser Level for Wall and Floor Tiling
- Essential Accessories and Consumables for Laser Maintenance
- Mastering Precision Layout for 2026 and Beyond
Key Takeaways
- Learn why green beam technology is the professional standard for visibility in bright UK extensions and conservatories.
- Discover how to select the best laser level for tiling by prioritising accuracy ratings of +/- 3mm at 10 metres to prevent cumulative layout errors.
- Master the use of 360-degree vertical planes to ensure perfectly centred layouts and avoid awkward thin tile slivers in corners.
- Identify the specific advantages of 3-line versus 2-line models for complex floor and wall alignment tasks.
- Understand which essential accessories, such as telescopic poles and tripods, are necessary to maintain a stable datum line across uneven substrates.
Defining the Professional Laser Level for Tiling
The transition from manual tools to laser technology has changed the pace of the trade. Manual levels require constant checking and re-marking, which introduces human error. A laser provides a constant reference point that doesn’t smudge or disappear under a layer of dust. Professionals can find a wide range of these high-precision instruments at newlocaltools.uk/shop/ to upgrade their current kit. These tools are built to withstand the harsh conditions of a busy site, featuring robust housings that protect the sensitive internal optics from moisture and debris.
Why Precision Layout Matters
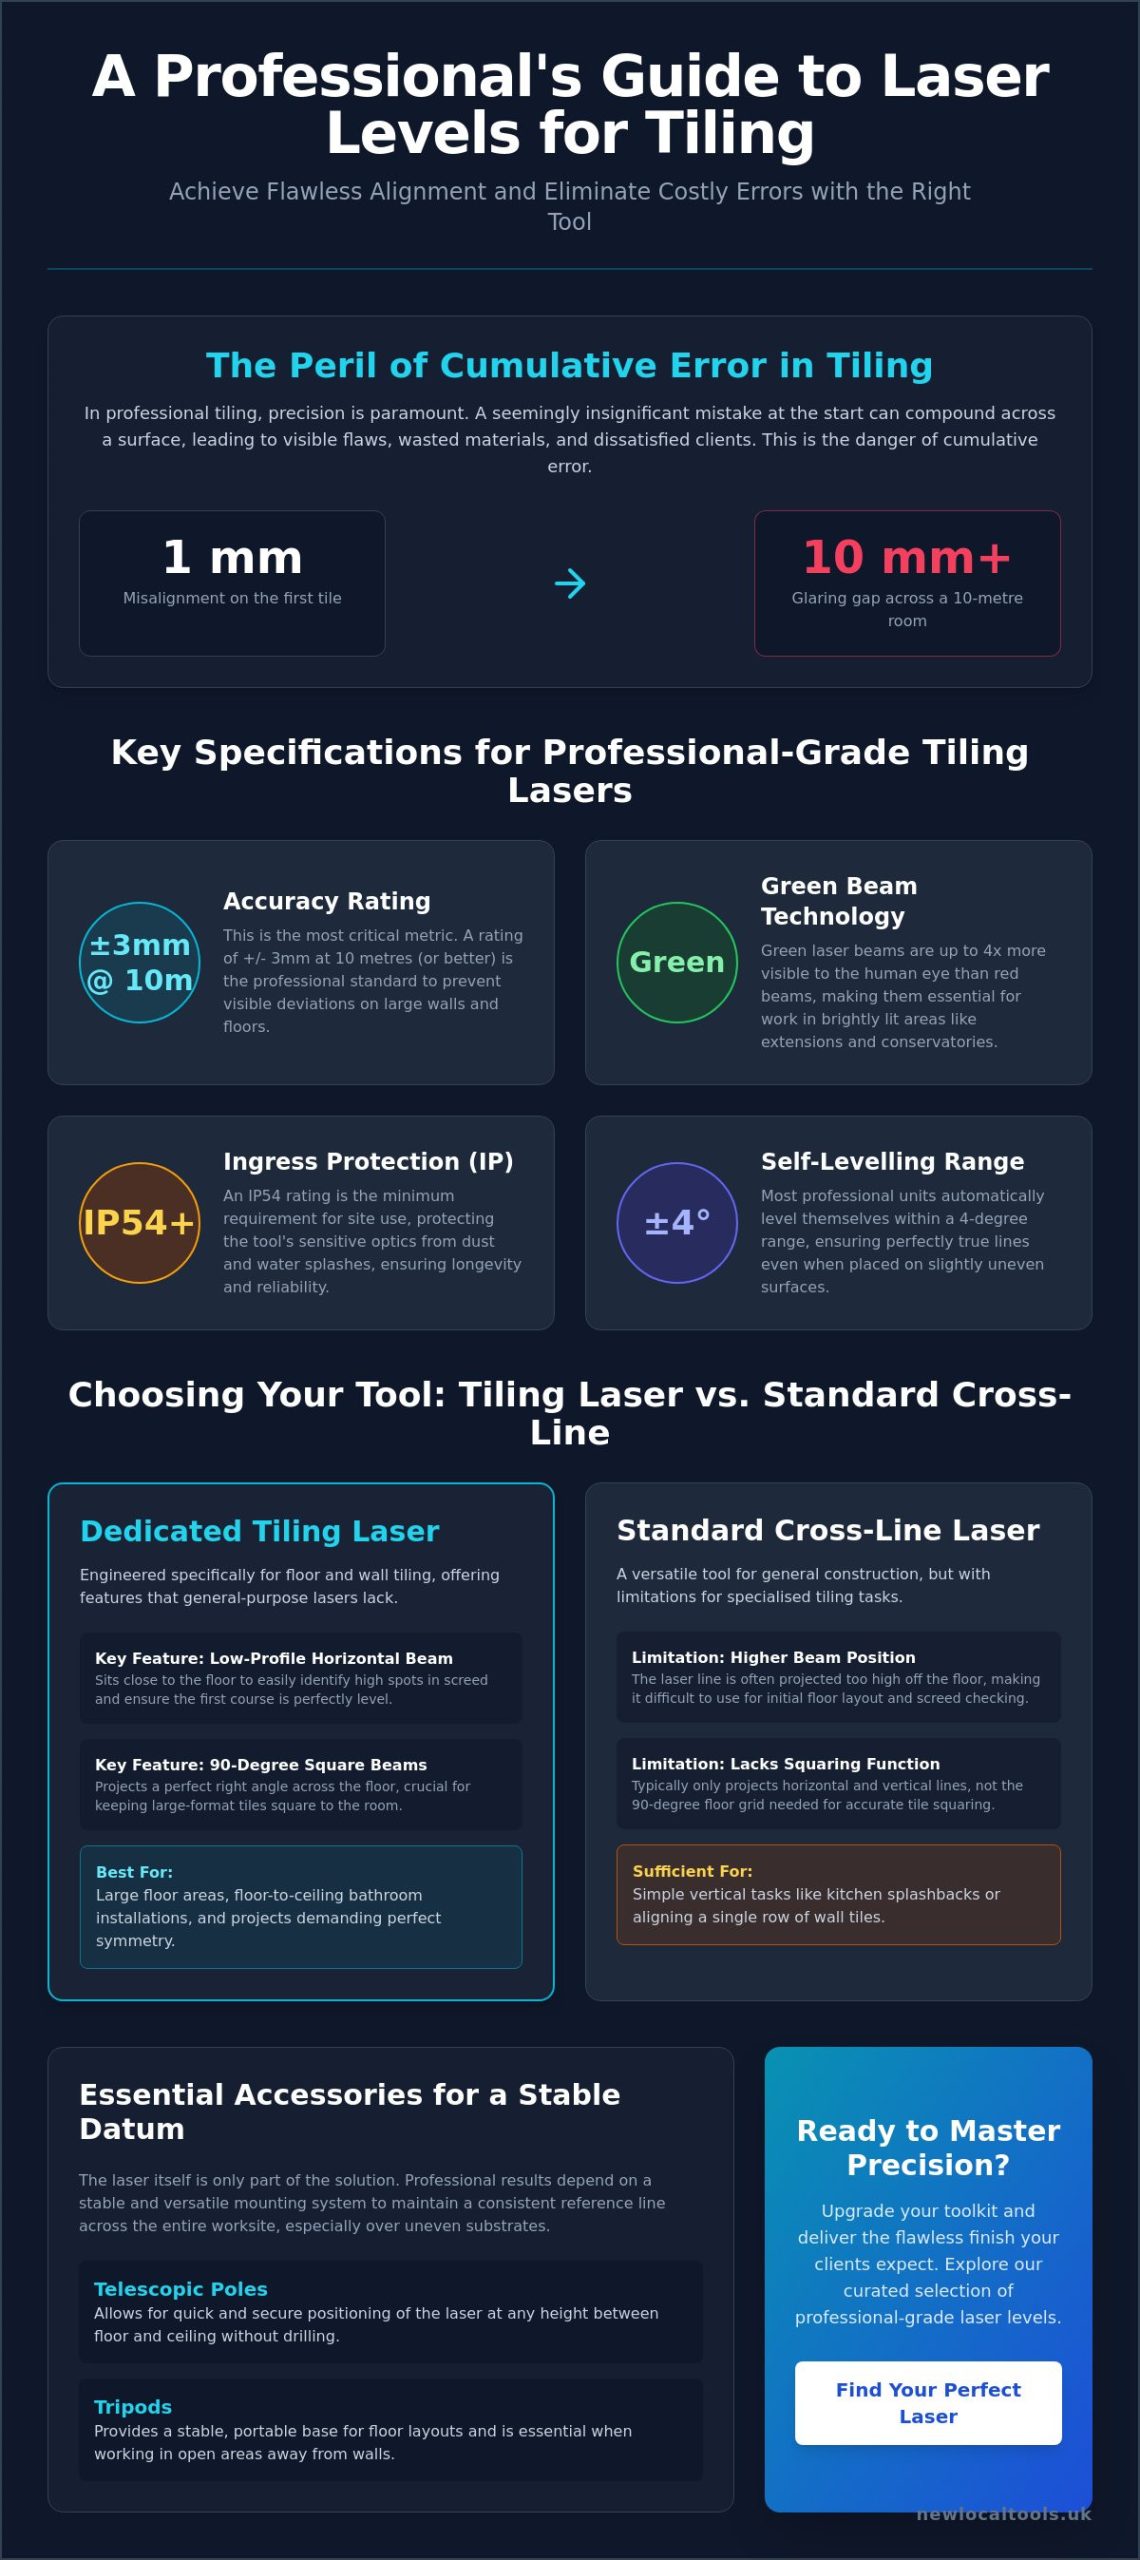
Small mistakes lead to massive problems in the tiling trade. The concept of cumulative error is a major risk for tradespeople working on large-scale projects. A tiny 1mm misalignment on the first row grows significantly as it’s repeated across several metres of large-format tiles. By the time the tiler reaches the far side of a room, that initial error results in a glaring gap or a slanted finish. Centred layouts are essential in high-end bathrooms and kitchens where symmetry defines the quality of the work. Lasers provide a way to perform “dry-run” visualisations instantly. This helps the user see exactly where the cuts will fall at the edges and corners before the first tile is fixed, reducing expensive material wastage.
Tiling Laser vs. Standard Cross-Line Laser
Selecting the best laser level for tiling depends on the specific geometry of the room. Dedicated tiling lasers often feature a low-profile horizontal beam. This beam sits very close to the floor surface, which is vital for spotting high spots in the screed or subfloor. Standard cross-line lasers are often designed for general construction and sit higher up, making them less effective for floor layout tasks. Professional tiling models also include 90-degree “square” beams. These project a perfect right angle across the floor to ensure the layout remains square to the primary wall. A standard cross-line laser is usually sufficient for simple kitchen splashbacks, but floor-to-ceiling bathroom work or large floor areas require the specialised planes provided by 360-degree tiling models.
Key Technical Specifications for Precision Tiling
The best laser level for tiling is defined by its data sheet rather than its brand name. Accuracy is the most critical metric for any professional tiler. Tradespeople should prioritise models offering a rating of +/- 3mm at 10 metres or better. Anything less precise risks visible deviations across long floor runs or high wall sections, where even a tiny error becomes magnified. High-quality internal pendulums ensure these tolerances are met consistently, even when the tool is moved between different rooms on a busy site.
Tiling is inherently a wet and dusty trade. Dust from tile cutters and splashes from mixing adhesive can easily compromise sensitive internal optics. An Ingress Protection (IP) rating of at least IP54 is essential to safeguard the tool against these common site hazards. Following established OSHA laser safety standards ensures that the equipment is handled correctly within a professional construction environment. This protection extends the life of the tool and maintains its calibration over time.
Most professional units level automatically within a 4-degree arc. A vital feature that separates trade-grade tools from DIY models is the “out-of-level” alarm. If the substrate is too steep or the unit is accidentally bumped, the laser will flash or beep to alert the user. Without this safeguard, a tiler might continue working with a line that looks straight but is mathematically incorrect. Professionals can find a range of professional site equipment that includes these critical accuracy indicators to prevent costly mistakes.
The Green vs. Red Beam Debate
Green lasers are now the standard for high-visibility work. The human eye is more sensitive to green wavelengths, making these beams up to four times brighter than traditional red ones. This is a massive advantage when working in bright UK conservatories or large open-plan extensions with lots of natural light. The trade-off is battery consumption; green diodes require more power and can drain a battery faster during a long shift. Red lasers remain a practical, cost-effective choice for smaller, darker bathrooms where extreme visibility is less of a concern.
Mounting and Stability Features
A laser is only as good as its mounting system. Professional units feature dual 1/4-inch and 5/8-inch tripod threads for maximum versatility across different stands. Magnetic brackets are particularly useful for wall tiling, as they allow the unit to be snapped onto metal dry-wall beads or corner trims. For the highest level of precision, look for models with fine-adjustment knobs. These allow the user to micro-shift the laser line horizontally or vertically without moving the base, which is essential for aligning grout lines perfectly with existing features.
Comparing the Best Laser Levels for Tiling Projects
Selecting the best laser level for tiling requires a clear understanding of the project’s scale. While a basic cross-line laser might suffice for a small kitchen splashback, modern wet rooms demand more sophisticated solutions. These environments often require floor-to-ceiling alignment across multiple planes to meet quality tile installation standards. A 360-degree vertical plane allows the tiler to project a continuous line around the entire room. This ensures that grout lines meet perfectly at every corner, a specific requirement that is often overlooked in general tool guides but is essential for professional-grade results in complex layouts.
| Tool Category | Primary Use | When You Need It |
|---|---|---|
| 360 Green Laser | Full room layout | Large format floors and open-plan areas |
| 3-Plane Laser | Vertical and horizontal alignment | Commercial wet rooms and complex bathrooms |
| Cross-Line Laser | Basic reference lines | Small splashbacks and home DIY tasks |
The distinction between 2-line, 3-line, and 360-degree models centres on the number of planes projected. A 2-line model provides a simple cross on one wall. A 3-line or 3-plane model projects lines that wrap around the ceiling, floor, and all four walls simultaneously. This creates a complete 3D grid. For tilers, the ability to see a floor line and a vertical wall line at a 90-degree angle is the most efficient way to ensure the room is square. High-end units offer better value for professionals because they eliminate the need to constantly reposition the tool, which reduces the risk of alignment errors.
At New Local Tools, we stock a full range of laser levels to suit every tiling project. For large-scale floor and wall layouts, the DeWalt DCLE34031N 18V XR 3x 360° Green Laser Level projects a continuous green beam around the entire room — ideal for wet rooms and open-plan areas. The DeWalt DCE089D1G 12V Self-Levelling Green Multi Line Laser Kit is a top seller for professional tilers who need a reliable, battery-compatible solution. For smaller bathrooms or kitchen splashbacks, the DeWalt DW088CG Green Beam Cross Line Laser Kit and the ToughBuilt TB-H2-LL-30-L2 Green Beam Cross Line Laser Level offer excellent accuracy at a lower price point. For point-to-point measurement, the Stanley INT177409 15m Laser Measurer and DeWalt DWHT77100-XJ 30m Distance Laser Measure speed up the set-out process significantly. To complete your setup, the DeWalt DE0881T Elevated Extendable Tripod provides the stable mounting needed for accurate datum lines across uneven substrates.
Step-by-Step: Using a Laser Level for Wall and Floor Tiling
Precision in tiling starts long before the first bag of adhesive is opened. The best laser level for tiling acts as a digital blueprint, allowing the user to map an entire room in minutes to identify potential issues before any tiles are cut. Unlike traditional methods, a laser provides a constant, non-smudging reference that stays visible as the work progresses. Following a structured approach ensures that the layout remains square and symmetrical, regardless of how uneven the subfloor or walls might be.
- Step 1: Establish the datum line. Set a “benchmark” height for the first full row of wall tiles. This reference point ensures all walls in a room match perfectly at the same level.
- Step 2: Project a vertical line. Centre the layout on the primary wall to avoid thin “slivers” or awkward cuts at the corners. This step is vital for creating a balanced aesthetic.
- Step 3: Lock the pendulum. If the project involves diagonal patterns or sloped wet room floors, the self-levelling feature must be locked to project fixed, angled lines.
- Step 4: Use a target plate. For large floor areas, a target plate helps verify height consistency by catching the beam at a fixed distance from the substrate.
- Step 5: Monitor the alarm. Always keep an ear out for the out-of-level warning. If the unit is bumped or the substrate shifts, the laser will alert the user immediately to prevent layout errors.
Setting Out a Floor Layout
Ensuring perfectly square grout lines across a large floor requires a 90-degree floor laser. This tool projects two lines at a precise right angle, allowing the tiler to align the first few rows with absolute confidence. When transferring lines through doorways into adjacent rooms, the laser should be positioned in the centre of the opening to maintain continuity. To manage shadows and obstructions, the unit should be placed on a stable tripod, ensuring the beam clears the height of tiles already laid. Professional tilers can buy high-precision site equipment to ensure their floor layouts are accurate to the millimetre.
Wall Tiling and Backsplashes
For kitchen backsplashes, the horizontal line should be set exactly one tile height above the worktop. This allows for a neat bead of sealant at the base whilst maintaining a full tile visual. When working on full-height bathroom walls, the vertical beam is used to align external corner trims and tile edges. This ensures the tiles don’t “drift” as the installer moves towards the ceiling. If the ceiling isn’t level, the laser helps identify the highest point, allowing the tiler to adjust the starting course so the top cut remains consistent and professional throughout the room.
Essential Accessories and Consumables for Laser Maintenance
Achieving a flawless finish requires more than just a high-quality laser unit. The best laser level for tiling performs at its peak only when paired with the correct support equipment. Tripods and telescopic poles provide the stability needed for accurate height adjustment in the centre of a room. For professionals working in bright UK conservatories or large open-plan spaces, laser enhancement glasses are a vital addition. These glasses filter out ambient light, making both red and green beams significantly easier to track across long distances. This is particularly useful when setting out complex floor patterns where the beam must travel several metres.
| Item | Use | Notes |
|---|---|---|
| AA or Li-ion Batteries | Powering the unit | Always carry a spare set to avoid site downtime. |
| Target Plate | Measuring height | Essential for floor levelling over 5 metres. |
| Telescopic Pole | Vertical mounting | Best for floor-to-ceiling bathroom layout. |
| Micro-adjust Base | Fine movement | Allows for mm-perfect alignment without lifting the laser. |
Proper storage is the most effective way to maintain calibration. Blow-moulded cases protect the sensitive internal pendulum from the vibrations and impacts common in a transit van. Tilers should treat their lasers as precision optical instruments rather than standard hand tools. Dropping a unit or subjecting it to extreme temperature changes can shift the internal diodes, leading to inaccurate lines that ruin a day’s work. Using protective cases and storage solutions is a small investment that prevents expensive recalibration fees. Calibration isn’t something to ignore; a tool that’s out by just a few millimetres can lead to a rejected project.
Calibration and Care
Mastering Precision Layout for 2026 and Beyond
Achieving perfectly straight grout lines and symmetrical layouts requires moving beyond traditional manual tools. The shift toward green beam technology and 360-degree projection has simplified complex wet room installations, making it easier to avoid cumulative errors on modern large-format tiles. Precision is maintained through rigorous site care and the use of stable mounting accessories like telescopic poles or micro-adjust bases. Selecting the best laser levels for tiling ensures that every project starts with a mathematically perfect grid, reducing material waste and significantly speeding up the set-out phase.
New Local Tools serves as a dependable partner for tradespeople across London and the wider UK. As an authorised stockist for industry leaders like DeWalt, Makita, and Bosch, the business provides expert technical support to help customers select the right specifications for specific project needs. Orders over £100 qualify for free UK delivery, ensuring that high-end precision remains accessible and affordable for every site. Explore the full range of professional laser levels and accessories at New Local Tools and take the guesswork out of the next tiling project.
Frequently Asked Questions
Is a green laser level worth the extra money for tiling?
Green lasers are worth the additional cost for professional tiling because they provide significantly higher visibility than red beams. This brightness is vital when working in sunlit UK conservatories or large open-plan extensions where red lines often become difficult to track. Whilst these units consume battery power faster, the improved visibility reduces layout errors and accelerates the setting-out process.
How do I check if my laser level is still accurate?
A simple field check involves projecting a horizontal line onto a wall from a distance of five metres. After marking the centre of the beam, the unit is rotated 180 degrees to see if the new beam aligns with the original mark. If the deviation exceeds the manufacturer’s tolerance, usually around 3mm at 10 metres, professional calibration is required to ensure grout lines remain perfectly straight.
Do I need a tripod for tiling, or can I set the laser on the floor?
A tripod is necessary for wall tiling, but floor layout often requires the laser to sit directly on the substrate. The best laser level for tiling floors usually features a low-profile design to project lines as close to the surface as possible. For wall work, a telescopic pole or tripod is essential to establish the datum line at the correct working height.



 153 Leytonstone Road, E15 1LH
 Log into your account


